
Upgrade EKS Self-Managed Node Groups
The following steps describe how to upgrade self-managed node groups to a newer Kubernetes version. To upgrade self-managed node groups to a newer version you will directly modify the underlying Auto Scaling group (ASG).
Note
Updates performed in other ways, such as Cloudformation or by letting the AutoScalingGroup scale down the cluster based on its Termination policy, may cause data loss since it is not guaranteed that they will properly drain the node.
What You'll Need
- A configured management environment.
- An existing EKS cluster.
- An existing Rok deployment.
Check Your Environment
Before you start upgrading the EKS self-managed node group, ensure that you have enabled Scale-in protection.
Procedure
Scale the Cluster Autoscaler deployment down to 0 replicas to avoid conflicting scaling actions:
root@rok-tools:~# kubectl scale deploy -n kube-system cluster-autoscaler --replicas=0
deployment.apps/cluster-autoscaler scaled
Determine the AMI name that you should use depending on the Kubernetes version you are upgrading to. Take a note of the correct AMI name as you are going to use it later:
Supported AMIs¶ Kubernetes version upgrading to AMI name 1.18 amazon-eks-node-1.18-v20220112 1.19 amazon-eks-node-1.19-v20220112 Find all the Auto Scaling groups associated with your EKS cluster:
root@rok-tools:~# aws autoscaling describe-auto-scaling-groups | \
> jq -r '.AutoScalingGroups[] |
> select(.Tags[] | .Key == "kubernetes.io/cluster/'${EKS_CLUSTER?}'" and .Value == "owned") |
> .AutoScalingGroupName'
arrikto-cluster-workers-NodeGroup-1WW76ULXL3VOE
...
Repeat steps a-k below for each one of the Auto Scaling groups in the list shown in the previous step.
Update the ASG to use the new AMI. To do so:
Select the ASG from the list.
Edit its Launch template.
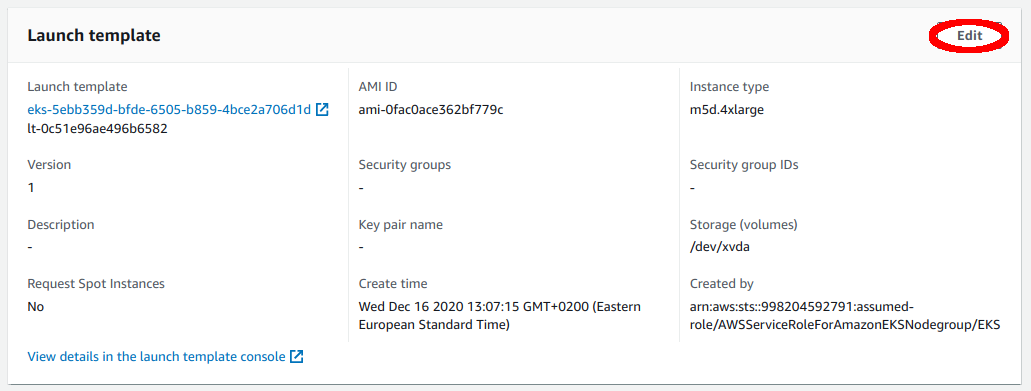
Create a new launch template version.

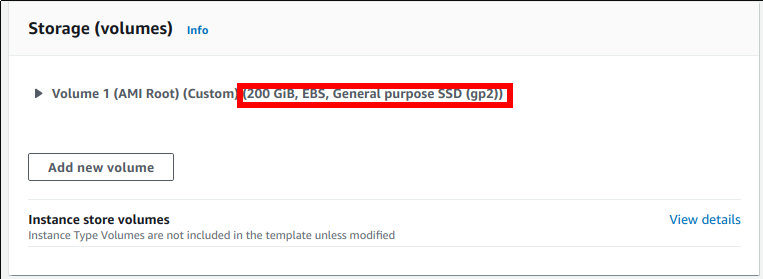
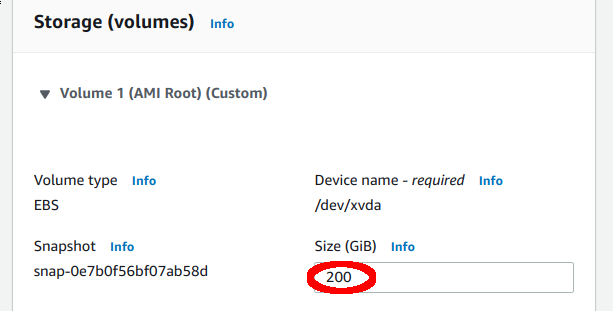
Inspect the Storage (volumes) section and make a note of the disks configuration. You will need this later on.
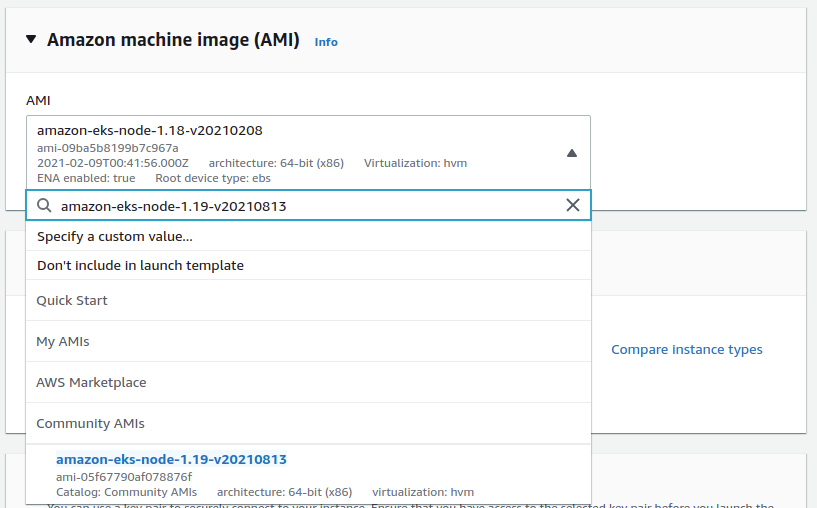
Set the new AMI name to use. In the drop-down list, select the correct AMI, according to step 3.
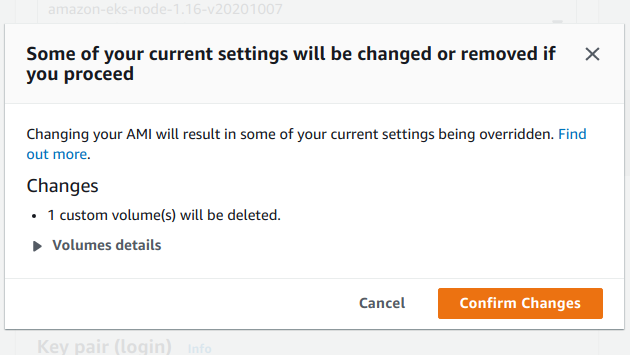
Setting a new AMI will reset the existing storage configuration. Click on Confirm Changes and proceed with it.
Modify the Storage (volumes) section and ensure that you maintain the same amount of storage for the root disk as before.
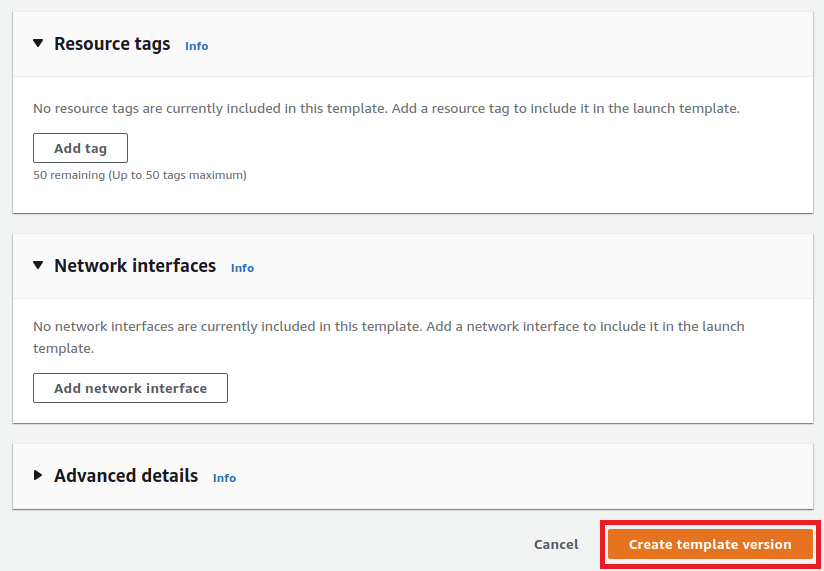
Create the new version.

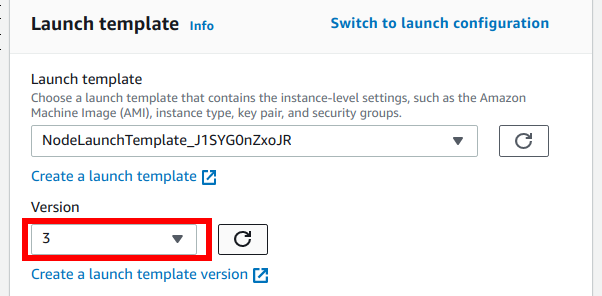
Go back to the Launch template section of the ASG, refresh the drop-down menu with the versions, select the newly created one and update the template.
Edit the ASG configuration and double the
Desired capacityso that instances with the new launch configuration will be added. If the new value forDesired capacityexceeds theMaximum capacity, adjust theMaximum capacityto match the new value. We opt to double the current size so that existing workloads can safely fit on the new nodes.Wait for all nodes to be added:
root@rok-tools:~# kubectl get nodes
NAME                                             STATUS   ROLES    AGE   VERSION
ip-172-31-32-188.eu-central-1.compute.internal   Ready    <none>   1h    v1.18.20-eks-8c579e
ip-172-31-34-84.eu-central-1.compute.internal    Ready    <none>   1h    v1.18.20-eks-8c579e
ip-172-31-44-254.eu-central-1.compute.internal   Ready    <none>   1m    v1.19.13-eks-8c579e
ip-172-31-47-215.eu-central-1.compute.internal   Ready    <none>   1m    v1.19.13-eks-8c579e
Wait for the Rok cluster to scale out itself:
root@rok-tools:~# kubectl get rokcluster -n rok rok
NAME   VERSION                          HEALTH   TOTAL MEMBERS   READY   MEMBERS   PHASE     AGE
rok    release-1.3-l0-release-1.3-rc7   OK       4               4       4         Running   1h
Make sure all nodes have the same ephemeral storage:
root@rok-tools:~# kubectl get nodes -o json | \
> jq -r '.items[] | .metadata.name, .status.allocatable["ephemeral-storage"]' | paste - -
ip-172-31-32-188.eu-central-1.compute.internal    192188443124
ip-172-31-34-84.eu-central-1.compute.internal     192188443124
ip-172-31-44-254.eu-central-1.compute.internal    192188443124
ip-172-31-47-215.eu-central-1.compute.internal    192188443124
Note
This way we ensure that you correctly copied the Storage (volumes) configuration from the old
Launch templateinto the new one.Find the old nodes that you should drain, based on their Kubernetes version:
Retrieve the Kubernetes versions running on your nodes currently:
root@rok-tools:~# kubectl get nodes -o json | \
> jq -r '.items[].status.nodeInfo.kubeletVersion' | sort -u
v1.18.20-eks-8c579e
v1.19.13-eks-8df270
Specify the old version:
root@rok-tools:~# K8S_VERSION=v1.18.19-eks-8df270
Find the nodes that run with this version:
root@rok-tools:~# nodes=$(kubectl get nodes -o jsonpath="{.items[?(@.status.nodeInfo.kubeletVersion==\"$K8S_VERSION\")].metadata.name}")
Cordon old nodes, that is, disable scheduling on them:
root@rok-tools:~# for node in $nodes; do kubectl cordon $node ; done
node/ip-172-31-32-188.eu-central-1.compute.internal cordoned
node/ip-172-31-34-84.eu-central-1.compute.internal cordoned
Verify that the old nodes are unschedulable, while the new ones do not have any taints:
root@rok-tools:~# kubectl get nodes --no-headers \
> -o custom-columns=NAME:.metadata.name,TAINTS:.spec.taints
ip-172-31-32-188.eu-central-1.compute.internal   [map[effect:NoSchedule key:node.kubernetes.io/unschedulable timeAdded:2021-08-20T11:47:34Z]]
ip-172-31-34-84.eu-central-1.compute.internal    [map[effect:NoSchedule key:node.kubernetes.io/unschedulable timeAdded:2021-08-20T11:47:38Z]]
ip-172-31-44-254.eu-central-1.compute.internal   <none>
ip-172-31-47-215.eu-central-1.compute.internal   <none>
Drain the old nodes one-by-one. Repeat steps i-iv for each one of the old nodes:
Find a node that runs with the old version:
root@rok-tools:~# node=$(kubectl get nodes -o jsonpath="{.items[?(@.status.nodeInfo.kubeletVersion==\"$K8S_VERSION\")].metadata.name}" | sed 's/ /\n/g' | head -n 1)
Drain the node:
root@rok-tools:~# kubectl drain --ignore-daemonsets --delete-local-data $node
node/ip-172-31-32-188.eu-central-1.compute.internal already cordoned
evicting pod "rok-redis-0"
evicting pod "ml-pipeline-scheduledworkflow-7bddd546b-4f4j5"
...
Wait for the above command to finish successfully and ensure that all pods that got evicted have migrated correctly and have become up-and-running again. Verify field STATUS is Running and field READY is n/n for all Pods:
root@rok-tools:~# kubectl get pods -A
NAMESPACE           NAME                    READY   STATUS    RESTARTS   AGE
auth                dex-7747dff999-xqxp     2/2     Running   0          1h
cert-manager        cert-manager-686bcc964d 1/1     Running   0          1h
...
Go back to step i, and repeat the steps for the remaining old nodes.
Go back to step 1, and repeat the steps for the remaining ASGs.
After you have drained all the nodes for all the ASGs, start the Cluster Autoscaler so that it sees the drained nodes, marks them as unneeded, terminates them, and reduces each ASG's desired size accordingly:
root@rok-tools:~# kubectl scale deploy -n kube-system cluster-autoscaler --replicas=1
deployment.apps/cluster-autoscaler scaled
Note
The Cluster Autoscaler will not start deleting instances immediately, since after startup it considers the cluster to be in cool down state. In that state, it will not perform any scale down operations. After the cool down period has passed (10 minutes by default, configurable with the
scale-down-delay-after-addargument), it will remove all drained nodes at once.
Verify
Ensure that all nodes in the node group are ready and run the new Kubernetes version. Check that field STATUS is Ready and field VERSION shows the new Kubernetes version:
root@rok-tools:~# kubectl get nodes
NAME                                              STATUS   ROLES   AGE     VERSION
ip-172-31-32-188.eu-central-1.compute.internal    Ready    <none>   1h     v1.19.13-eks-8df270
ip-172-31-34-84.eu-central-1.compute.internal     Ready    <none>   1h     v1.19.13-eks-8df270
What's Next
The next step is to upgrade the Autoscaler of your EKS cluster.